Thursday, September 24, 2009

Front Door and Curtains!

It seems like Michigan fall is settling in. It's beginning to get darker sooner, so many of our pictures are being taken in the dark. It's cooler out. Sweatshirt weather has set in, football games have begun (GO BLUE!), and we've finally picked out some siding. The siding is the last big outdoor project we have left. So while Dad and Bob talk about G channels, and J channels, and integrated J channels and all that other exciting siding stuff, I've been focusing on interior design.

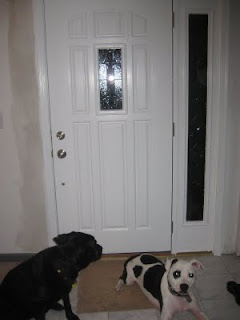
So here's a couple of side projects that we've been working on. The front door has finally been painted. The color is Sundried Tomato by the folks over at Sherwin Williams on the outside, and white on the inside.


My other obsession has been finding the perfect curtains for the master bedroom. It's been a long hunt, but I've finally found ones I love at Cost Plus!


No curtain rods yet just Bob. So what do you guys think? Isn't it totally Ors (and Bob if he had an opinion)?

Friday, September 18, 2009

And it Looks Better!


So it looks better already (see just a temporary set back).


Our new door wall!


Dining room back to normal.


Our new bay window in the kitchen!

Monday, September 14, 2009

It has to look worse before it looks better. Right?

So we have jumped, head first, into replacing the sliding door and window off of the kitchen. This project has become a serious endeavor.  Replacing rotting 2 x 4's, 2 x 6's and every other possible wood types that are in the wall. Foam board is in bad shape, insulation is in bad shape - the whole thing in bad shape.

And somehow, when it seemed like we were making so much progress, we took a big leap back (well not really - but that's what it looks like)

Our new sliding door - with a great plywood appearance

The deck from the outside:

Ahh the window (Where's Scamp?):
More of the deck. The sliding door from the outside:

Just keep reminding myself, it will look a lot worse before it looks better.

Monday, September 7, 2009

The Deck Part 2: Detaching from the house and then some

Orsi's dad attached the deck to the new posts and cut the deck away from the house:


We wanted to pry the long, wide boards attached to the house away, but there's no room to pry. So we cut away the metal brackets:

 
Those sparks are hot! With the bracket cut loose, we removed the piece of wood, making room to pry the boards off:
 
 
We removed the large bolts and pried away. Some segments were stuck pretty good, and some practically fell off. This is why you don't attach the deck to the house! Here are some of the boards we pulled off:


While we were at it, we removed most of the rotted siding as well. Some of the foam board underneath will probably also have to go:

 
The next step will be to replace the window and sliding door over the deck. Then we can redo the siding. Then we can close the deck back up.


The Money Pit

When we tell people about our house, more than half the time we get a response along the lines, "Have you seen the Money Pit?" Somehow, neither of us had ever seen this 1986  movie. Well, it's not that mysterious, actually. Orsi was in communism and movies were just not a big part of Bob's family at that time.

Anyway, once we learned of the movie, Orsi didn't want to see it - she was afraid it would jinx us. As if our house needed any help in that department. So Bob added it to the netflix queue, and several months later, it finally percolated to the top.

We watched it. We were highly amused.

We have to say, our house is simply not that bad. As far as we know so far. On the flip side, Bob is also not Tom Hanks. We guess we'll have to take the good with the bad.

Saturday, September 5, 2009

Before and After: The Master Bedroom

While the deck is slowly but surely being removed from the house, the master bedroom is also underway. If you will, let's take a trip down memory lane:

This is the second time Bob and I looked at this place and decided that, yes we are buying it. Note the hole in wall to the left of door wall with only a piece of carpet nailed to the outside shielding ti from the elements. Note the walk in closet with mirror doors.
 

Look at nasty door wall and windows. Yes my friends, those are pink blinds and old gross carpet.

Here we are in progress. We moved the wall out for the master closet to make it a nice big walk in:


We have made great strides in the master. And although I don't see us affording the flooring we want this year, take a look at what moving some walls around, replacing plywood, new windows and a fresh coat of paint will do:

No more hole where the AC unit used to be. Good bye double mirrored doors, hello pocket door leading into master closet. The closet from the inside (filled with our construction stuff):

 
And now the brand new door wall and windows:

 
As you can see below, we do have some touch ups we need to do, but nothing that we can't handle.

Before and After: The Bathroom

We have finally reached a point where we can start showing before and afters. I mean real ones. Not like the angels on the wall, now you see them now you don't.

This past week we finished, for real finished the bathroom. I feel like pictures say a thousand words. So here's the before:

  Here's the in progress:
 And the final product:

Do you see the detail in the tile? The counter top? The lack of wall paper and added beautiful floral pics?

Deck Part 1, Section 2

What the cutest pups in the world were doing as Bob worked on the deck and I supervised.


Tuesday, September 1, 2009

The Deck Part 1: Digging Post Holes

There were two decks on the house: the main one off the kitchen, and a small one off the master bedroom. The small one was in really bad shape, so we demoed it a while ago (we plan to replace it eventually, but it's not high priority right now). The large one we're hoping to keep mostly as is -- the railings need a little repair, but otherwise it's in good shape.

Except for one thing. It is common to attach one side of a deck to the foundation, and have the other side rest on posts. But this deck is too high to attach to the foundation, so some previous owner decided to attach it to the house, through the siding and everything.


That dark horizontal strip in the upper left is the bottom of the siding, which is about where the foundation ends. The bolt in the far upper-left is where the deck is attached.

This is bad. Besides not being as strong as it should be (wood!=concrete), the hole in the siding is causing a very small leak in the basement (and who knows what damage under that siding). So our solution is to put posts in along the house, and have the deck fully supported on the posts. So it will be up against the house (exactly as it is now), but not actually attached to the house. The procedure is basically to put in posts, attach the deck to the posts, and then detach the deck from the house (and then make whatever repairs are necessary to the house).

So I needed to dig some post holes. First thing we did was remove the decking closest to the house. Now, normally one would get a post hole digging machine (essentially a giant screw attached to a lawn mower motor), but we had to work between the joists, which are only 16" apart, and thus there was no space. So I had to do it by hand. We only needed 5 holes, 42" deep -- how bad can it be? Long story short, my hands are very sore. (Each hole took about 3 hours from start to finished post.)


See how much fun I'm having?


Here I am pouring a bucket of concrete into a hole I just dug. (Orsi helped with this part.) That's right, I'm digging holes, filling them back up, and then we'll cover it all so no one ever knows how hard I worked.


At least the dogs kept me company.

While we've got the decking off, we'll also replace the window and sliding door that are over the deck. We'll also have to get the new siding in before we can close things up (siding is the next major project).